New cabinet pulls are a relatively inexpensive way to completely change the look of your kitchen cabinets. The tricky part isn’t picking the pulls, it’s getting every single one mounted straight and in the exact same spot across dozens of doors and drawers. Here we are going to discuss how to install cabinet pulls where there were none before.
A crooked pull or two is the kind of small mistake that stands out every time you walk into the room. This guide shows you a simple, repeatable method for installing cabinet pulls that are consistently straight every time.
Table of Contents
ToggleTools and Materials You'll Need
- New cabinet pulls
- Drill with the correct size drill bit for the screws
- Tape measure
- Pencil
- Painter’s tape
- A cabinet hardware jig, or a piece of scrap wood or cardboard to make your own template
- Combination square or ruler
- Screwdriver (optional)
Get the exact method for starting a home remodel the right way. Check out How To Start A Home Remodel.
Where Should Cabinet Pulls Be Placed?
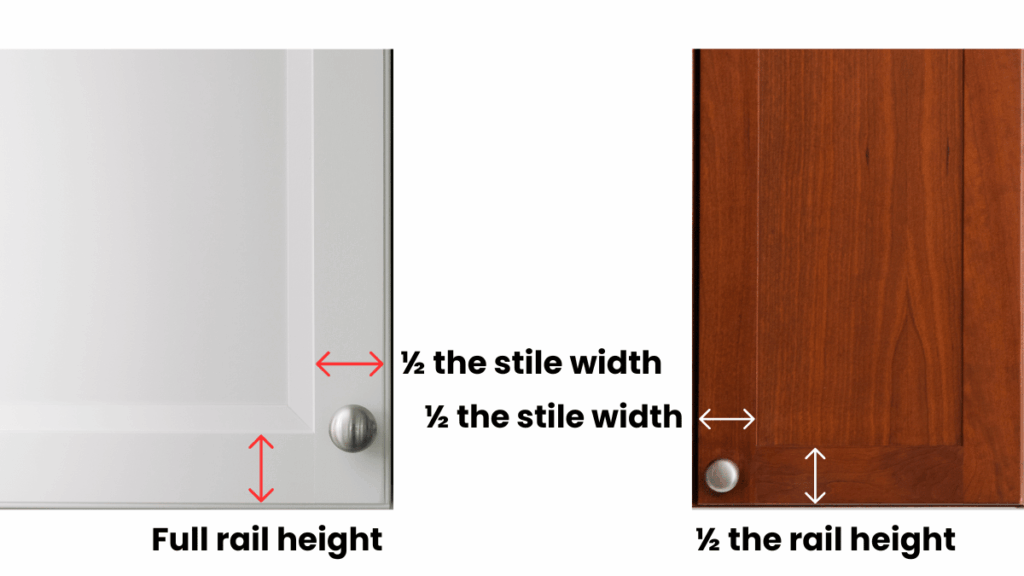
There are a few options for cabinet hardware placement. It comes down to the style of your door, and personal preference. Wherever you decide to place the handles or knobs, it’s important to be sure to install all the hardware in the exact location for each door. It is not easy to move the handles without leaving a blemish where the previous hole was drilled. This is what I think is the Best Cabinet Touchup Kit for fixing these repairs.
One guideline that should be followed for door hardware placement is if they are on lower cabinets, the hardware should be near the upper corner opposite the hinges. If it’s an upper door, they should be on the lower corner opposite hinges. The exact location you choose depends on door style, and personal preference. Some people put them in the middle of the door, but this doesn’t happen often because not as many people like this style.
For drawer faces it’s best to place the handles centered on the drawer. To find the location of the holes you will need to measure the distance between them and divide by two. This value is what you will either add or subtract from the center value of the drawer face. The vertical placement is half the height of the drawer face.
It is not recommended to use knobs for drawers. They can be used on the doors if that is what you want to go with, but the drawers should have handles that are similar to the knobs in style and color. The knob may make the drawer open crooked, causing it to stick.
If you are replacing handles on cabinets that already have hardware, you want to find an option with the same hole distance. This way you will not need to drill any new holes. There are general sizes for cabinet handles that make it easy to find new options. Bring one of the old handles with you to the hardware store.
Step 1: Decide on Cabinet Pull Placement
Before you drill a single hole, decide where the pulls will sit. The upper doors will be the same, lower doors are the same as well. Each drawer size will have its own placement. A few common placement options include:
- Vertical pulls mounted along the edge of the door closest to where it opens
- Horizontal pulls centered on the door, either near the top corner or centered top to bottom
- Horizontal pulls centered on drawers, roughly in line with the drawer’s center point
Vertical pulls on the doors are the most common, and are ergonomically comfortable. Proper placement comes down to the owner’s personal preferences. What matters most is picking one placement, then sticking with it throughout the house.
Step 2: Measure and Mark the Cabinet Pull Location
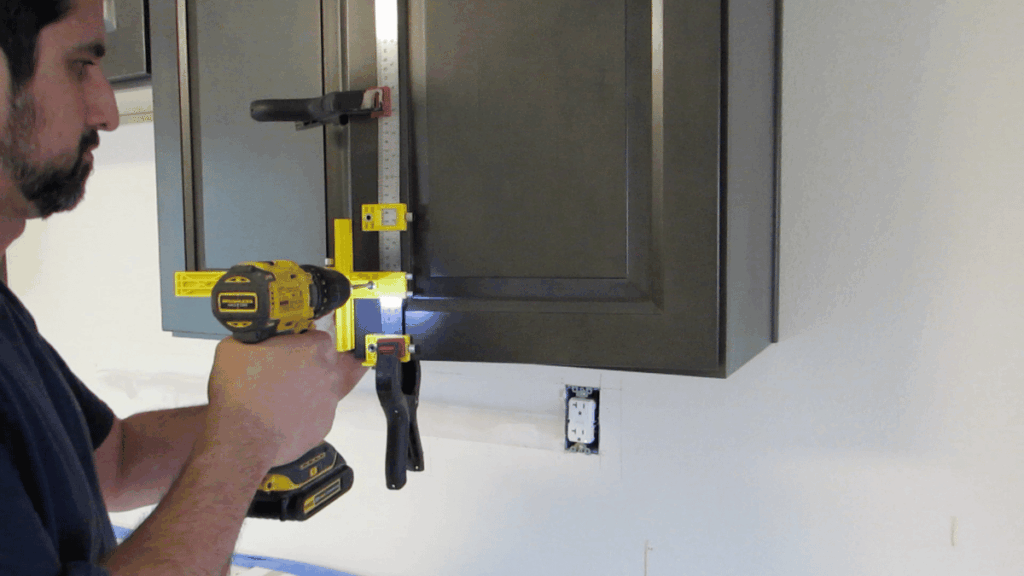
A cabinet hardware template is not required for this project, but will help a lot. They are good for speeding up the installation time. They also help keep all the holes in the same position every time, giving a consistent result. There are several different options to choose from when it comes to these types of templates. The Cabinet Hardware Template I like is affordable, made from good materials, and easy to use. Click the link above to learn more.
Find Cabinet Pull Location
To set up the template you must know the location of the first hole. Start by putting the piece with the end stop on the slide ruler, with the stop on the outside edge. After putting the pieces in their proper location you want to tighten the thumb screws. Make sure they are tight enough to stay secure the entire time. They tend to slide out of position, so you want to periodically check if the hole placement is correct.
Place Drill Hole 1 on Template
The next piece to add is one with a hole for the drill bit. This is going to be Drill Hole 1 in the diagram above. If you are installing knobs, this is the only hole you will need to drill through. Use the measurement from the top or bottom of the door (depending on if it’s an upper or lower) to the center of the hole. This is the distance from the inside of the stop on the first piece to the center of the hole on the second piece. After you have this measurement, tighten it down.
Place Drill Hole 2 with End Stop on Template
The next piece to attach has another ruler on it. There is also an end stop on this piece that’s held against the vertical edge of the cabinet door. To get the measurement for the hole placement I like to attach one of the cabinet door pulls to the bottom hole that’s already secure. Then I slide the second hole into place and attach the other screw to the pull. Now it’s time to lock this piece in place. This is a quick and easy way to make sure the hole spacing is perfect every time.
To know where the stopper placement will be, use your tape measurement from the inside edge of this stopper to the center of the hole. This distance is typically half the width of the stile, unless you decided on a different cabinet door pull placement.
Pro Tip:
If you don’t have a premade cabinet door pull template, you can make your own using three pieces of scrap wood. You need a piece of plywood that’s larger than the corner of the door that holds the pulls. Attach two smaller pieces to two adjacent edges on the plywood that can serve as the stops, overlapping both sides so you can use the template on left and right hand doors.
Step 3: Double-Check Everything Before Drilling
This step is very important. When doing work like this you always want to measure twice and cut (or in this case drill) once. Do this by holding the template in place and making a mark at each hole. I like to take the drill bit I will be using, and hold it in each hole with my hand. Then I lightly twist the bit to make a tiny mark at the center of this hole.
Take the template down and hold the handle next to it. I like to hold the handle sideways next to these marks to make sure the hole location lines up with the handle. I then hold the handle on top of these marks to visualize if the handle looks good or not.
If there are any mistakes, now is the time to correct them. It’s difficult to fill the holes once they are drilled.
Step 4: Drill the Holes
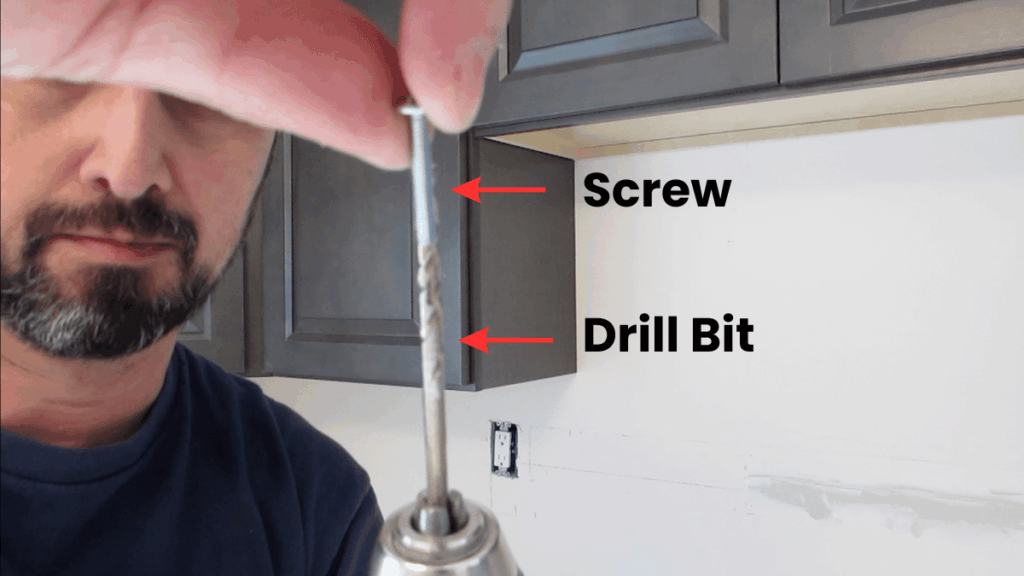
To determine which drill bit to use, hold one of the screws up in front of the drill bit. You want the bit to be roughly the same size as the diameter of the screw. This is the bit you will be using for this task, so you can attach it to the drill.
If the bit is too small the screws will not fit through. In this case you may ream out the hole a bit more by moving the drill bit around in the hole. If the drill bit is too big you run the risk of the handle getting pulled into the hole. This will make the handles feel loose when in use.
Hold the template in place with both of the stops pressed flat against the edges of the door. Clamp the template in place to keep it secure and lined up correctly. Drill each hole slowly, making sure the bit is perpendicular to the door. You don’t want it going in diagonally as the handle won’t attach to the screw correctly.
You may need to clear out the sawdust a couple of times by pulling most of the drill bit back out towards you. Do this 2-3 times to get a clean hole. Also don’t press very hard when pushing the bit through the other side. You want to avoid blowing out any excess material that may be visible after the handles are attached.
Pro Tip:
Find proper hole placement by drilling a piece of scrap wood first. Install a handle when done so you can hold it up against the door. Once you feel confident your template is aligned it’s time to get started with drilling holes in the cabinet doors.
Step 5: Attach the Cabinet Pulls
I prefer to install the handle as soon as the holes are drilled. This isn’t required, but it’s a nice way to feel like you are making progress. It’s also easy to see what doors are remaining.
The hardware you choose usually comes with screws. If you need to purchase more the size you should get is 8-32, and you would pick a suitable length. That’s size 8 diameter, and 32 threads per inch.
The screw length is determined if you are installing that particular handle on a drawer or door. If it’s a door the length should be able to penetrate through the thickness of the door, plus approximately ¼ inch to grip the handle. Usually cabinet doors are ¾ inch in width, but you want to measure yours to double check.
The screws used for a drawer will need to go through the drawer box and the drawer face plus ¼ inch. Thicknesses for drawer materials may vary, so it’s best to get a measurement of your cabinets before you purchase more.
To install the cabinet hardware, open the door or drawer and slide a screw into the hole you just drilled. Use a screwdriver to tighten the screw by hand. You do not need to use a drill, but if you do use one, make sure to set the chuck to a setting that will cause it to stop spinning once tight. This will help prevent overtightening it, making it difficult if you ever need to change the handles in the future.
Common Cabinet Hardware Mistakes
If you still have some cabinets that you need to install, take a look at the article on How To Install Cabinets The Right Way. Also take a look at the list of the most common cabinet hardware mistakes so they don’t happen to you.
Not measuring accurately when no template is used.
This happens when you begin to rush. It’s always a good idea to measure twice before drilling.
Not checking if the template came loose.
When the cabinet hardware template has been used for some time, it’s possible for the thumb screws to come loose. This can allow the holes to slide out of place. Eventually they may be in a noticeably wrong position, or slid so far apart that the handle doesn’t fit in both holes.
Holding the drill bit at a crooked angle.
If the drill isn’t perpendicular to the cabinet door, the screw may not be able to attach to the handle. This happens if the two holes are at different angles. The fix for this is to ream out the crooked hole a bit more before trying to install the handle again.
Overtightening the hardware.
When using a drill to install the hardware it’s easy to overly tighten the screws. This can make it hard to remove the handles in the future if you decide to update the handles.
Frequently Asked Questions
How do I make sure my cabinet pulls are perfectly straight?
The most reliable way is to use a cabinet hardware template and clamp it securely in place before drilling. Always double-check your measurements and hole placement before drilling, and keep your drill perfectly perpendicular to the cabinet surface.
Do I really need a cabinet hardware template?
No, but it makes the job much easier and more accurate—especially if you’re installing multiple handles. Without one, you’ll need to measure carefully for every single door or drawer, which increases the chance of mistakes.
What’s the standard placement for cabinet pulls on doors?
For lower cabinets, place pulls near the upper corner opposite the hinges. For upper cabinets, place them near the lower corner opposite the hinges. The exact placement can vary based on style and preference, but consistency across all cabinets is key.
Where should pulls go on drawers?
Drawer pulls are typically centered both horizontally and vertically on the drawer face. Measure the width, find the center point, and align your handle accordingly.
What size drill bit should I use?
Choose a drill bit that matches the diameter of your screws. A good rule of thumb is to hold the screw in front of the bit—the bit should be about the same size as the screw shaft (not including the threads).
Can I fix a crooked cabinet pull after drilling?
It’s possible, but not ideal. You may need to slightly widen (ream) the hole to adjust alignment. If the mistake is significant, you might need to fill the holes with wood filler and touch-up paint before re-drilling.
Conclusion
Now you have successfully drilled your cabinet doors and installed new cabinet door hardware. My most important bit of advice is to take your time, and go at a comfortable pace. If you rush any part of it you are more likely to run into problems.
Following the steps above will make sure your cabinet hardware looks perfectly straight every time.
For those of you that are planning a bigger home remodel Download the Free Remodel Planner. This will help you stay organized and on budget.
You got this!